Our team will be closed from February 14 to 23, 2026, for the Chinese New Year holiday. Normal business operations will resume on February 24, 2026.
During this period, order processing and customer support responses will be delayed. We encourage you to plan your purchases accordingly. For urgent matters, please contact your regional representative in advance.
On behalf of everyone at Nanchang KindlyMeditech, we extend our sincerest wishes for a happy, healthy, and prosperous Year of the Horse. Thank you for your continued support and collaboration.
If you’ve ever visited a clinic, pharmacy, or hospital, you’ve likely seen a syringe. It looks simple a small tube with a needle but it’s actually a carefully designed medical tool. One of the most common types use today is the 3-part syringe (also called a three-piece syringe).
Healthcare workers like it since it’s safe, accurate, and super easy to use. From giving vaccines to drawing blood samples, this syringe is used every single day around the world.
In this complete guide, you’ll learn:
What a 3-part syringe is
Its parts and how it works
Types and sizes available
Uses in medical
Advantages over 2-part syringes
How to choose the right one
We’ll keep the language simple so anyone can understand it.
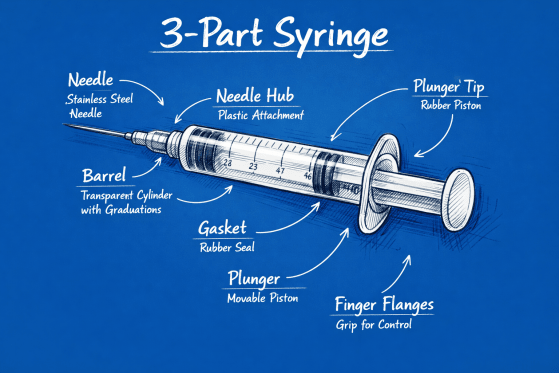
What is a 3-Part syringe?
A 3-part syringe is a disposable medical syringe made of three separate components:
A Barrel
Pull Plunger
Rubber gasket (also known as a piston or stopper)
What makes them different is that rubber piece. It seals the barrel tightly, letting liquid medicine move easily and be measured correctly.
Reusing syringes spreads infections like HIV and hepatitis.
How Sterilization Works
Most disposable syringes are sterilized using Ethylene Oxide (EO) gas.
Why EO sterilization?
Kills bacteria and viruses
Safe for plastic
Keeps syringe transparent
Long shelf life
Shelf life is usually 3–5 years if sealed.
How to Choose the Right 3-Part Syringe
Picking the correct syringe matters for comfort and accuracy.
Step 1 : Select Size
Match medicine volume:
Small dose → 1 ml or 2 ml
Normal injection → 3 ml
Large dose → 5 ml or 10 ml
Step 2 : Choose Tip Type
Vaccination → Luer lock
Quick clinic use → Luer slip
Feeding tube → Catheter tip
Step 3 : Check Needle Gauge
Thin needle = less pain
Gauge
Use
31G
Insulin
26G
Pediatric
24G
Vaccine
22G
IV drug
Step 4 : Verify Sterility
Look for :
Individually packed
EO sterilized mark
Expiry date
Key Takeaways
A 3-part syringe has barrel, plunger, and rubber gasket
It provides accurate and smooth injections
Used in hospitals, clinics, labs, and veterinary care
Safer and more reliable than 2-part syringes
Always use once and dispose properly
Final Thoughts
The 3 part syringe might not seem like a very important medical tool, but it is very important in modern healthcare. Vaccination, life saving drugs, and daily treatments rely on its accuracy.
Everything changed when the rubber piston was added. It made the patient more comfortable, cut down on mistakes, and made procedures safer for both the patient and the healthcare worker.
Now you know what a syringe is… it’s not just a piece of plastic with a needle in it. It’s a well-thought-out device that will send medicine right where it’s needed.
A syringe is something you’ve probably seen in a lab, hospital, or clinic. Some syringes are better made than others, though. 2-Part Syringe is a popular type. It looks easy, but it’s a very important part of giving safe injections and collecting fluids. This guide explains what a 2-part syringe is, how it works, where it’s used.
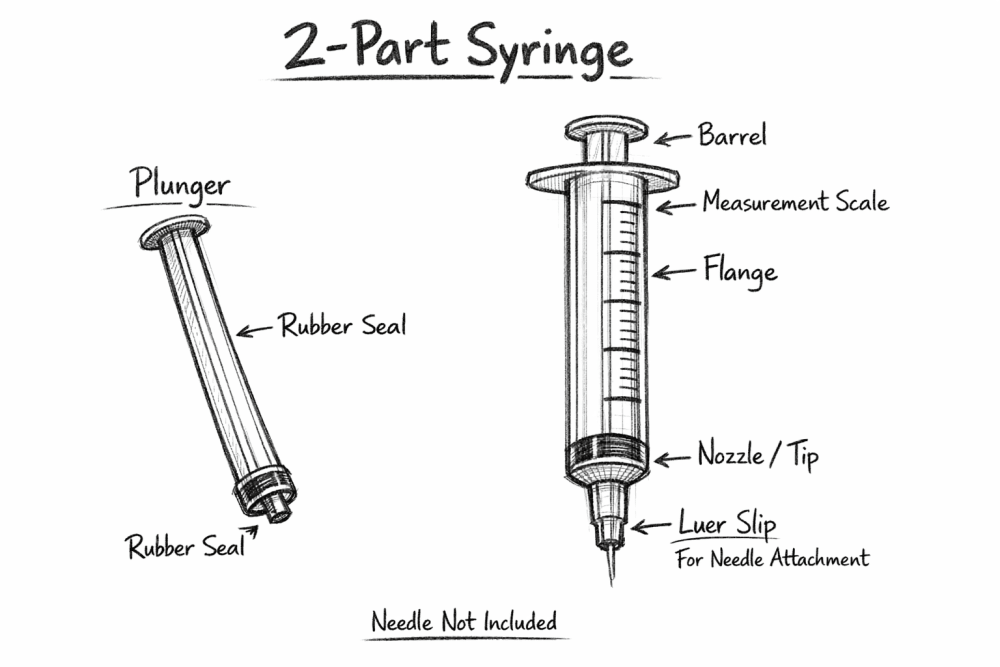
What Is a 2-Part Syringe?
A 2-part syringes is a disposable syringe that’s made up of just two main parts:
Barrel
Plunger (no rubber gasket)
Unlike a 3-part syringe, it doesn’t have a rubber stopper at the end of the plunger.
This straightforward design makes it super popular in hospitals, labs, vet clinics, and research places.
Key Components of a 2-Part Syringe
Knowing how a syringe works helps explain why this design is better for some uses.
1. Barrel
Most of the time, the barrel is made of medical-grade plastic like polypropylene. It has measurement marks that let users accurately control how much medicine is given or taken away.
2. Plunger
The plunger moves inside the barrel to make pressure or suction. In a 2-part syringe, the body is usually made of the same or a similar material as the barrel and does not have a rubber tip.
3. Tip
Most syringes also have a tip that can be attach to a needle or tubing. These tips usually have luer lock or slip-tip connections that make them safe to use.
How Does a 2-Part Syringe Work?
The basic idea behind how it works is simple:
When you pull the plunger back, it makes negative pressure, which pulls fluid into the barrel.
When you push the plunger forward, the fluid comes out through the tip or needle.
Most syringes have the same mechanism; the only difference is how the seal is made. A 2-part syringe doesn’t have a rubber gasket to make the seal. Instead, the plunger and barrel fit tightly together.
Hospitals prefer latex-free syringes to avoid allergic reactions.
Sizes Available in 2-Part Syringe
Different medical tasks need different sizes. The most common options include:
Syringe Size
Typical Use
1 ml
Vaccines, insulin alternatives
2 ml
Pediatric injections
3 ml
General medicine
5 ml
Antibiotics
10 ml
IV flushing
20 ml
Lab sampling
Advantages of a 2-Part Syringe
1. Reduced Risk of Chemical Interaction
Rubber components can sometimes react with certain medications or sensitive compounds. Removing the gasket lowers the risk of contamination or chemical incompatibility.
2. Lower Material Complexity
With fewer parts, manufacturing is simpler, which can support consistent quality and reduce potential points of failure.
3. Suitable for Specialized Applications
Pharmaceuticals and lab research are two examples of fields that need to use few additives. These fields often pick equipment that has fewer parts that could mess up the results.
4. Cost Efficiency
2-part syringes are an ideal option for high-volume environments due to their lower manufacturing costs.
Disadvantages of a 2-Part Syringe
Even though they have certain advantages, 2 part syringes aren’t always the best choice.
Not as smooth to use
The plunger may not move as smoothly as it does in a 3 Part Syringe without a rubber stopper.
Possible Small Leaks
Some users choose 3 part syringes for situations needing particularly tight seals because rubber seals often offer higher leak resistance.
Limited Clinical Preference
Because they enable consistent performance during injections, 3 part syringes are often used in healthcare.
Common Uses of 2-Part Syringe
Two-part syringes are not always the most common choice in hospitals, but they are very useful in many areas.
Laboratory Work
Researchers often use them to measure and transfer liquids with precision.
Pharmaceutical Manufacturing
They are helpful when rubber compatibility is a concern for certain drug formulations.
Veterinary Medicine
Some veterinary practices use simplified syringes for controlled dosing.
Specialty Medical Procedures
When material sensitivity is important, getting rid of rubber can be helpful.
Why Hospitals Still Use 2-Part Syringes
You might wonder why doctors choose it when 3-part exists.
The answer is practical:
Large vaccination programs need affordable syringes
Many drugs don’t need ultra-tight sealing
Faster filling saves time in busy wards
In high-volume healthcare settings, the 2-part syringe is efficient.
Are 2-Part Syringe Safe?
Yes, 2-part syringes are safe for their intended uses as long as manufacturers make them according to medical standards. They should be like all other sterile medical devices:
Used once unless explicitly labeled reusable
Properly disposed of after use
Stored in clean, controlled environments
It is very important to follow standard infection control procedures, no matter what kind of syringe you have.
How to Choose Between a 2-Part and 3-Part Syringe
Selecting the right syringe depends on your application.
Choose a 2-part syringe if:
Rubber interaction could compromise the substance
You need a simplified design
Laboratory accuracy is the priority
Choose a 3-part syringe if:
Smooth plunger movement is essential
Maximum leak prevention is require
You are performing routine clinical injections
When in doubt, consult medical or laboratory guidelines for your specific procedure.
How syringes will be made in the future
Medical device makers keep coming up with new ideas by focusing on
Better ways to keep people safe
Better harmony with materials
Less damage to the earth
More accurate results
As drug formulations get more complicated, there may be a greater need for specific syringe designs, such as those with two parts.
Final Thoughts
The 2-part syringe is another useful and simple type. Getting rid of the rubber stopper makes it easier to use in labs, for pharmaceutical work, and for other specialized medical purposes. It also lowers the risk of material interaction.
The three-part syringe may be better for daily clinical use, and we may not fully replace it. Healthcare workers, researchers, and purchasing teams can make safer, more compatible, and more accurate decisions when they are aware of these differences.
Both types of syringes will likely still be useful in the future, even though medical technology is getting better. This is because they are both very important to modern medicine and scientific research.
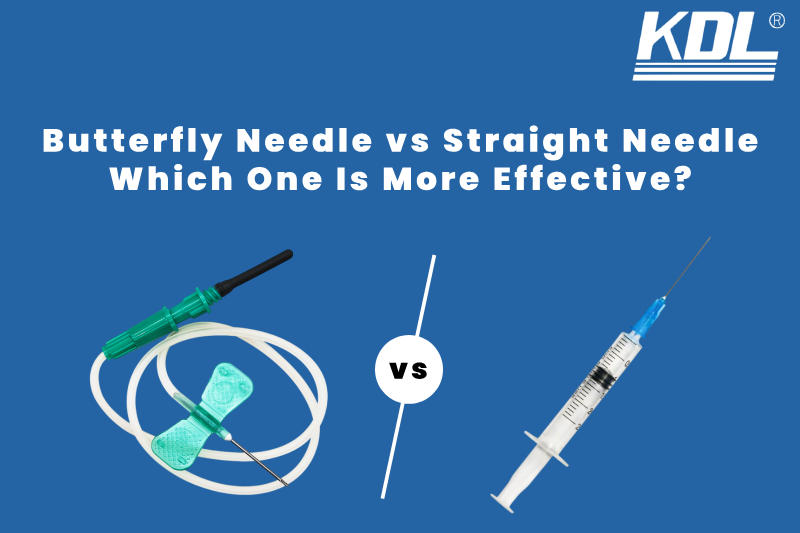
If you have ever had blood drawn or given an injection, you have used a needle. But not all needles are the same. Two of the most common types are the butterfly needle and the straight needle. Many people ask about the difference between butterfly needle and straight needle, and which one is better.
In this guide, we will break it all down in plain language. We will look at how each needle works, when it is used, and the pros and cons of both. By the end, you will clearly understand butterfly needle vs straight needle and why healthcare workers choose one over the other.
Learning the Basics About Medical Needles
First, let’s talk about what medical needles are used for.
There is a thin, hollow tube called a medical needle. This is what it’s used for :
Draw blood
Give injections
Deliver Medicine Into The Body
Needles are available in a variety of sizes, types, and styles. The design changes how safe, comfortable, and accurate it is. That’s how butterfly needles and straight needles are different.
What Is a Butterfly Needle?
A butterfly needle is also called a winged infusion set. It has small plastic wings on each side. These wings look like a butterfly, which is how it got its name.
Key Parts of a Butterfly Needle
Short, thin needle
Flexible plastic tubing
Two soft wings for grip
Connector at the end for tubes or syringes
The wings help the person giving the injection hold the needle steady.
Common Uses of Butterfly Needles
Butterfly needles are often used when veins are small or hard to reach. Common butterfly needle uses include:
Drawing blood from children
Blood tests for older patients
Patients with fragile or rolling veins
Short-term IV access
Because the needle is smaller, it can be less painful for some people.
Sizes of Butterfly Needles
Butterfly needles usually come in smaller gauges, such as:
A higher gauge number means a thinner needle. Thin needles are gentler on veins but may take longer to draw blood.
What Is a Straight Needle?
A straight needle is a simple needle attached directly to a syringe or tube holder. It does not have wings or tubing.
Key Parts of a Straight Needle
Longer needle
Rigid design
Direct connection to syringe or tube
This is the most common needle used in medical settings.
Common Uses of Straight Needles
When veins are easy to find, straight needles are often used. Some common uses for a straight needle are:
Adult blood draws
Injections like vaccines
Drawing Large Blood Samples
Routine medical procedures.
They work well, are quick, and are easy to find.
Sizes of Straight Needles
Straight needles come in many sizes, including:
18 gauge
20 gauge
21 gauge
22 gauge
Lower gauge numbers mean thicker needles, which allow faster blood flow.
Butterfly Needle vs Straight Needle: Main Differences
Now let’s look at the difference between butterfly needle and straight needle side by side.
Butterfly Needle vs Straight Needle : Design and Structure
The design of a needle affects how it is used and how easy it is to control.
Butterfly needles have small plastic wings on each side. These wings help healthcare workers hold the needle steady. The needle is short and connected to flexible tubing, which allows gentle movement without pulling on the vein.
Straight needles, on the other hand, do not have wings or tubing. They are longer and more rigid, which gives direct control during insertion.
Butterfly needles are flexible and easier to adjust
Straight needles are firm and direct
Butterfly Needle vs Straight Needle : Comfort Level for Patients
Patient comfort is very important, especially for people who are afraid of needles.
Butterfly needles are often seen as less scary because they are smaller and thinner. Many patients say they feel less pain when a butterfly needle is used.
Straight needles can feel stronger when they enter the skin, which may cause more discomfort for some people.
Butterfly needles are often preferred for children
Sensitive patients usually feel more comfortable with butterfly needles
Straight needles may feel more intense
Butterfly Needle vs Straight Needle : Control and Precision
Healthcare workers choose needles based on how easy they are to control.
Butterfly needles work well for small or fragile veins. The wings and tubing help prevent sudden movement that could hurt the vein.
Straight needles give steady pressure and are useful when veins are easy to see and feel.
Butterfly needles offer better control for small veins
Straight needles work best for deep or firm veins
Butterfly Needle vs Straight Needle : Blood Flow Speed
Blood flow speed matters during blood tests and lab work.
Straight needles allow blood to flow faster because there is no tubing slowing it down. This makes them better for collecting large blood samples.
Butterfly needles have thinner tubing, which slows blood flow.
Straight needles are faster
Butterfly needles are slower but gentler
Butterfly Needle vs Straight Needle : Risk of Vein Damage
Keeping veins safe is a top priority.
Butterfly needles reduce vein movement, which lowers the chance of vein damage or collapse. This makes them a good choice for older patients or people with weak veins.
Straight needles can put more pressure on the vein, especially if the patient moves.
Butterfly needles lower the risk of vein collapse
Straight needles may cause more vein stress
Butterfly Needles: Pros and Cons
Let us look at what butterfly needles do well and what they do poorly.
Advantages of Butterfly Needles
Better for veins that are small or weak
More comfortable for many patients
During insertion, it is easier to control
Vein damage risk is lower
Because of these pros, they are perfect for certain situations.
Disadvantages of Butterfly Needles
More expensive than needles with straight edges
Slower Blood Draw
Not Ideal For Large Samples
They aren’t always used for regular draws because they are expensive.
Straight Needles: Pros and Cons
There are both strong and weak points to a straight needle.
Because of these things, straight needles are usually the best choice.
Disadvantages of Straight Needles
Some people may find it painful.
It’s tougher to use on small veins.
Lack of flexibility during insertion
You need to be skilled and sure of yourself to use them.
Comparison of Butterfly Needle and Straight Needle Prices
Most of the time, straight needles cost less. This is why a lot of people use them in loud places.
It costs more for butterfly needles because
They have more parts.
For special circumstances, they are designed.
Cost vs. Benefits
Despite the fact that butterfly needles cost more,
Reduce Repeat Sticks
Improve Patient Comfort
Save time when dealing with difficult veins
Most of the time, the value is greater than the cost.
Butterfly Needle and Straight Needle: Which One Is Better?
There is no single best choice. The right needle depends on the patient and the situation.
If the patient has small or fragile veins, a butterfly needle is often the better option. If the veins are strong and easy to find, a straight needle works well.
Understanding the difference between butterfly needle and straight needle helps healthcare workers make the best choice.
Final Thoughts
Both butterfly needles and straight needles play an important role in healthcare. Each has strengths and limits.
By knowing the difference between butterfly needle and straight needle, patients can feel more informed, and healthcare workers can choose the right tool for each job.
Whether it is a routine blood test or a difficult vein, the right needle makes all the difference.
Blood collection may seem straightforward, but little decisions may have a major impact. The venipuncture needle size and gauge are two of the most crucial decisions. Using the right needle may reduce pain, prevent vein damage, and provide a clean blood sample.
Venipuncture needle sizes and gauges are explain in this guide in simple terms. You will learn how to choose the right needle for accurate blood collection, whether you are a student, a novice phlebotomist, or a healthcare professional brushing up.
What Is a Venipuncture Needle?
A venipuncture needle is a sterile needle use to draw blood from a vein. It is most often use for lab tests, blood donations, and medical exams.
Venipuncture needles come in different sizes, lengths, and gauges. Each option serves a purpose. Choosing the wrong one can cause slow blood flow, bruising, or a failed draw.
Understanding Needle Gauge (The Basics)
What Does Needle Gauge Mean?
Needle gauge refers to the thickness of the needle. This can be confusing at first because:
Takeaways: Choosing the Right Venipuncture Needle Size and Gauge
When it comes to venipuncture needle sizes and gauges, there is no one size fits all solution.The ideal needle size for venipuncture is determined by the patient’s age, vein size, and method of blood collection. Understanding phlebotomy needle sizes helps to prevent mistakes, increase patient comfort, and ensure accurate lab results.
Healthcare workers who understand venipuncture needle gauge selection are more likely to succeed on the first stick and avoid sample issues like hemolysis.
Final Thoughts
The sizes and gauges of venipuncture needles are essential to collect accurate blood samples. Get a grip on how gauge, length, and needle type all fit together can really help you make smarter choices each time.
When you match the needle to the patient and the vein, it really helps make things more comfortable, cuts down on mistakes, and guarantees that the lab results are spot on. Once you practice and pay attention to the little things, picking the right needle will feel like a breeze.
If you’re diving into phlebotomy or just looking to sharpen your skills, getting a handle on venipuncture needle sizes is super important for nailing those blood draws with confidence.
Blood collection is a routine part of medical care. It helps doctors check health, diagnose illness, and track treatment. While it may seem simple, drawing blood safely and with less pain depends a lot on the type of needle used. There are different types of needles used in blood collection, each serving a different function.
Choosing the right needle could improve comfort, reduce vein damage, and provide accurate test results. In this article, we’ll talk about the four different types of needles used for blood collection, how they function, and when to use each one.
Why Needle Choice Matters in Blood Collection
Veins vary. Some patients have prominent veins others have small, fragile, or rolling veins. Age, health, and hydration can also affect veins.
A patient can feel more at ease and well informed by being aware of the different types of needles for blood collection.
Understanding Types of Needles Used in Blood Collection
1. Straight Needles (Multisample Needles)
One of the most popular needles used in blood collection to draw blood is a straight needle, also known as a multisample needle. There is only one straight needle with sharp ends on both sides.
One end goes into the patient’s vein. The other end connects to a vacuum blood collection tube.
How Straight Needles Work
Straight needles are usually use with an evacuated tube system. Once the needle is place in the vein, the tube is push onto the back end. The vacuum inside the tube pulls blood in automatically.
This setup allows multiple tubes to be fill from one needle stick.
When Straight Needles Are Used
Straight needles are often use when:
Veins are strong and easy to access
Multiple blood tubes are need
Blood donation is being perform
Adult patients are being test
2. Butterfly Needles (Winged Infusion Sets)
A butterfly needle is a small needle with two flexible plastic wings on each side. It is also called a wing infusion set. On the back, there is also thin tubing.
This is one of the most well-known types of needles use todraw blood, especially for people who have trouble with their veins. It looks like butterfly wings on the soft plastic wings. During blood collection, these wings aid the healthcare professional in keeping the needle steady.
When Butterfly Needles Are Used
Butterfly needles are often use for:
Children and olderly patients
Patients with small or fragile veins
Hand or wrist vein access
Patients who fear needles
3. Vacutainer Needles
A Vacutainer needle, a popular type of blood collection needle, integrates with a vacuum tube system. Hospitals, diagnostic labs, and clinics widely consider it one of their most reliable choices for blood collection.
Double ended needles are vacutainer needles. One end goes into the patient’s vein, and the other connects to a vacuum-sealed blood collection tube. The tube draws blood on its own once it attaches.
Vacutainer needles are used with a tube holder and evacuated tubes. After the needle is inserted into the vein, the tube is pushed into the holder. The vacuum inside the tube pulls blood into it without the need for manual suction.
This system enables for multiple tubes to be filled with a single needle insertion, making the procedure quicker and more efficient.
When Vacutainer Needles Are Used
Vacutainer needles are widely use for:
Regular blood testing
Lab tests for diagnosis
Health examinations
Clinic and hospital blood draws
Multiple-sample blood collection
They particularly excel when you require steady blood flow and precise sample volumes.
4. Safety Needles
Safety needles protect healthcare workers from accidental needle sticks. These blood collection needles have safety features that cover or retract the needle post-use.
User activates the safety mechanism post-blood collection. This could:
Slide the shield over the needle.
Retract the needle into the device.
Lock the needle into position.
This helps prevent injuries and infections.
When Safety Needles Are Used
Safety needles are use in :
Hospitals and clinics
Blood banks
High volume testing labs
Facilities following strict safety rules
Needle Sizes and Gauges Explained
When talking about types of needles used for blood collection, size also matters. Needle size is measure by gauge.
When talking about types of needles used for blood collection, size also matters. Needle size is measure by gauge.
What Does Gauge Mean?
A greater gauge number indicates a thinner needle.
A smaller gauge number indicates a thicker needle.
Common Needle Gauges for Blood Collection
21-gauge: standard adult blood draws
22 gauge: Smaller veins
23 gauge: butterfly needles and fragile veins
How Professionals Select the Right Blood Collection Needle
Healthcare staff examine various considerations when picking a needle:
Patient’s age
Vein size and condition
Type of test necessary
Amount of blood required
Patients’ comfort and safety
Choosing the right needle for blood collection enhances both the experience and the quality of the test.
Safety and Hygiene in Blood Collection
Regardless of the needle type for blood collection, healthcare professionals consistently adhere to safety rules:
Only single-use needles
Sterile packaging
Dispose properly in sharps containers.
Gloves and antiseptics are essential.
These measures safeguard patients and healthcare staff.
Final Thoughts
Blood collection may feel routine, but the tools used play a big role in safety, comfort, and test accuracy. Understanding the four different types of needles used for blood collection empowers patients with greater knowledge and equips healthcare workers to select the right option for each situation.
If your veins are looking good, straight needles and Vacutainer needles are the way to go for fast and easy blood draws. Safety needles give healthcare pros some extra protection, but butterfly needles really shine when it comes to handling those tiny or delicate veins.
No one-size-fits-all blood collection needle out there. The right choice depends on the patient’s veins, the amount of blood required, and the type of test the clinician performs.
If you ever feel a bit nervous about getting your blood drawn, just remember: innovative needle alternatives exist to make the experience easier and more comfortable. Getting to know how different needles for blood collection work could help ease some of the stress in a tough situation.
Why You Should Choose KDLNC
KDLNC is a reputable provider of medical supplies, recognized for safe, reliable, and high-quality blood collection products. We focus on getting it right, making sure everything feels good and is safe in all our products, especially our blood collection needles and related gear. Our Products are design to meet quality standards and ensure accurate results in clinical and laboratory settings. KDLNC prioritizes small details in blood collection. Our needles ensure smooth insertion, steady blood flow, and less patient discomfort.
One of the most popular clinical procedures in healthcare is venipuncture. Every day, blood tests, IV access, blood donations, and many other treatments use it. The venipuncture needle is a small but very important tool that is at the heart of this easy but very important job.
This guide explains what a venipuncture needle is, how it works, the different kinds that are out there, and how to pick the right one. Nurses, phlebotomists, medical assistants, lab technicians, and other healthcare professionals who want clear, useful knowledge should read it.
What Is a Venipuncture Needle?
A venipuncture needle is a hollow, sterile needle that is designed to go into a vein and collect blood or deliver fluids. It is most typically used during blood draws for lab testing, although it is also utilized in blood donation and blood draws.
The needle makes a small hole in a vein that lets blood flow into a collecting tube, syringe, or IV line. Venipuncture needles are designed to be accurate, pointed, and smooth since veins are fragile.
Even though venipuncture needles are tiny, they really make a big difference in patient care. Getting accurate blood samples is super important for doctors. It helps them figure out what’s going on with diseases, keep an eye on treatments, and avoid any complications down the line.
Choosing the right needle:
Helps ease patient pain and anxiety
Reduces the chances of hemolysis
Enhances the quality of samples
Reduces needlestick injuries
OSHA (Occupational Safety and Health Administration), emphasizes that using needles safely is crucial for keeping healthcare workers safe from bloodborne pathogens.
The Primary Components of a Venipuncture Needle
Understanding the different parts of a venipuncture needle is super important for medical professionals to ensure they use it the right way and keep things safe.
Needle shaft
The shaft is basically a long, hollow metal tube. After entering the vein, blood flows through this channel.
Bevel
The bevel is that slanted tip you see on the needle. A nicely designed bevel helps make skin and vein penetration smoother and less painful.
Hub
The hub is that plastic part that links the needle to a syringe, holder, or IV tubing. It’s usually color coded to indicate the size of the needle gauge.
Needlestick injuries can expose healthcare workers to serious diseases such as hepatitis B, hepatitis C, and HIV.
Safety Tips
Never recap needles
Use safety devices correctly
Dispose of needles immediately
Report injuries promptly
The CDC and OSHA strongly recommend safety venipuncture needles in clinical settings. Healthcare professionals select venipuncture needles by collaborating with reputable medical device companies that adhere to strict safety and quality standards. KDLNC is part of the Kindly (KDL) Group. It is globally recognized for producing high-quality medical puncture equipment, including venipuncture and blood collection needles.
Venipuncture needle are used in various medical settings
Venipuncture needles are commonly used in various healthcare settings.
Medical facilities
When it comes to high-volume blood draws and IV access, it’s all about using needles that are both durable and designed with safety in mind.
Clinics and labs
Making sure everything is accurate and that patients feel comfortable is what we focus on the most.
Places to Donate Blood
Using large-gauge needles helps speed up blood flow and keeps donor veins safe.
Technology that makes walls thinner for better flow
Easy-to-hold grips
The purposes of these changes are to lessen pain, make samples better, and keep healthcare workers safe.
Final Thoughts
A venipuncture needle is small yet essential in modern medicine. This tool aids in accurate diagnosis and effective care, from routine blood tests to life-saving treatments.
Knowing what a venipuncture needle is, its function, and how to select the appropriate one aids medical professionals in enhancing patient outcomes and ensuring workplace safety. Healthcare teams can confidently perform venipuncture by adhering to guidelines from trusted organizations such as the CDC, WHO, and OSHA.
Mastering venipuncture needle selection and technique is crucial for both newcomers and experienced professionals in healthcare to ensure safe, high-quality patient care.
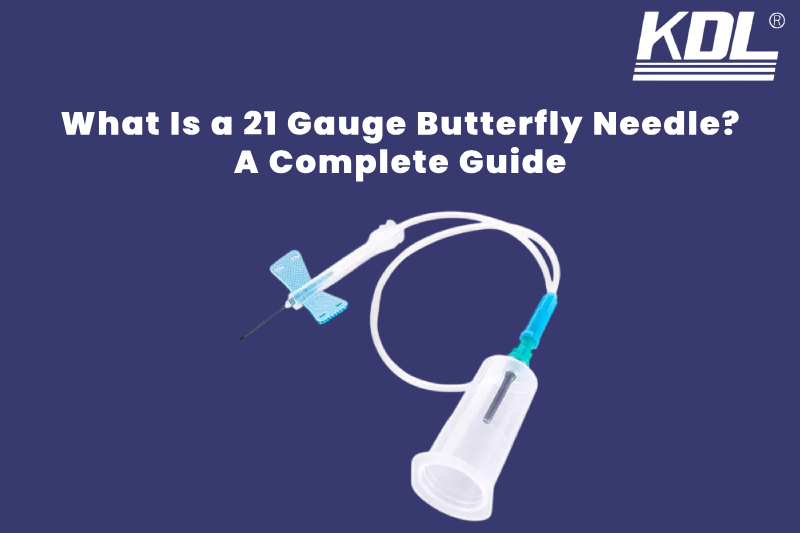
If you’ve ever had blood drawn or an IV placed, a butterfly needle was most likely used. These little, winged needles are widely used in hospitals, labs, and clinics. One of the most common sizes is the 21 gauge butterfly needle (also known as the 21g Butterfly Needle).
In this complete educational guide, we’ll explain everything in simple words. You will learn about a 21 gauge butterfly needle, how it works, when it is used, and why healthcare practitioners like it.
What Is a Butterfly Needle?
A butterfly needle is a small needle with two flexible plastic “wings” on the sides. These wings help the healthcare worker hold the needle steady during use. The needle is connected to a thin tube that allows blood or fluids to flow.
There are three primary parts in butterfly needle:
The needle is a narrow, hollow tube made of metal.
The wings are made of soft plastic and help you maneuver the plane.
The tubing is flexible and attaches to an IV line or collecting tube.
The 21g butterfly needle is all about the size of the needle itself, not the wings or tubing.
What Does “21 Gauge” Mean?
The word “gauge” tells us how thick the needle is. In needle sizing, the higher the gauge number, the thinner the needle.
Understanding Needle Gauge Sizes
Here’s a simple way to think about it:
18 gauge: thick needle
21 gauge: medium thickness
25 gauge: very thin needle
A 21 gauge butterfly needle is considered a standard, medium-sized needle. It is one of the most commonly used sizes for blood collection in adults.
Why the 21 Gauge Butterfly Needle Is So Popular
The 21g Butterfly Needle is a popular choice since it works well and is comfortable. I t is broad enough to enable excellent blood flow yet thin enough to reduce pain.
Benefits of a 21 Gauge Butterfly Needle
Allows steady blood flow
Comfortable for most adult patients
Easy to control
Works well for routine blood draws
Widely available in medical settings
This balance makes the 21 gauge butterfly needle a top choice for many healthcare professionals.
Common Uses of a 21 Gauge Butterfly Needle
The 21g butterfly needle is used in many medical situations. Let’s check out the most popular ones.
In some cases, a butterfly needle is used for short IV treatments, such as giving fluids or medication over a short time.
Diagnostic Testing
Many diagnostic tests require clean, steady blood samples. The 21 gauge butterfly needle helps reduce hemolysis, which means damage to red blood cells.
Who Typically Uses a 21 Gauge Butterfly Needle?
The 21 gauge butterfly needle is mainly used for adult patients with normal, healthy veins.
Ideal Patient Types
Adults with visible veins
Patients needing routine blood work
Outpatient lab patients
Emergency room patients
While it’s great for many people, it may not be the best choice for everyone.
Environmental Considerations
Medical waste is a growing concern. While butterfly needles are single-use, many manufacturers now focus on:
Reduced plastic use
Safer disposal designs
Compact packaging
These changes help lower environmental impact.
When a 21 Gauge Butterfly Needle May Not Be Ideal
Even though the 21g Butterfly Needle is very versatile, there are times when a different size is better.
Situations Where Another Gauge Is Chosen
Children or infants – usually need smaller needles
Olderly patients with fragile veins – thinner needles may be safer
Patients with very small veins – smaller gauges reduce vein damage
Healthcare workers always assess the patient before choosing the needle size.
21 Gauge Butterfly Needle vs Other Needle Sizes
Comparing a 21 gauge butterfly needles to other sizes clarifies its common selection.
21 Gauge vs 23 Gauge Butterfly Needle
21 gauge: faster blood flow, slightly thicker
23 gauge: thinner, slower blood flow, less vein trauma
A 23 gauge is preferable for small or fragile veins, while a 21 gauge is more efficient for standard draws.
21 Gauge vs Straight Needles
Straight needles are devoid of wings or tubing. In contrast to conventional needles, a 21g butterfly needle provides:
Better control
Less movement in the vein
More comfort for the patient
Clinicians often prefer butterfly needles for tricky or sensitive draws.
How a 21 Gauge Butterfly Needle Is Used
The process of using a butterfly needle follows standard medical steps.
Step-by-Step Overview
The skin is clean with antiseptic
The wings hold the needle
The needle is insert into the vein at a shallow angle
Blood flows through the tubing into collection tubes
Clinicians remove and dispose of the needle safely.
The design of the 21 gauge butterfly needles makes these steps easier and safer.
Safety Features of Modern Butterfly Needles
Many modern 21 gauge butterfly needles come with built-in safety features.
Common Safety Features
Retractable needles
Push-button needle shields
Automatic needle covers
These features help reduce the risk of needle stick injuries for healthcare workers.
Comfort and Pain Level: What Patients Experience
One of the biggest concerns patients have is pain. The good news is that the 21g Butterfly Needles is design with comfort in mind.
What Affects Pain During a Blood Draw?
Needle size
Skill of the person drawing blood
Vein condition
Patient anxiety
Most patients report mild or brief discomfort when clinicians use a 21-gauge butterfly needle.
Materials Used in a 21 Gauge Butterfly Needle
For safety and performance, it’s crucial to use high-quality materials.
Common Materials
Needle made of stainless steel
Wings made of medical-grade plastic
Flexible tubing that won’t kink
These materials assist keep blood flowing smoothly and lower the chance of breaking.
Sterility and Single-Use Design
A 21 gauge butterfly needle is always single-use only.
Why Single-Use Matters
Prevents infection
Reduces cross-contamination
Meets medical safety standards
Dispose of the needle in a sharps container after use.
How to Choose the Right Butterfly Needle Size
Healthcare workers consider several factors before choosing a 21g Butterfly Needle.
Key Factors Considered
Patient age
Vein size and condition
Type of procedure
Amount of blood needed
The 21 gauge butterfly needle is often the first choice when conditions are normal.
Common Myths About 21 Gauge Butterfly Needles
Myths About 21 Gauge Butterfly Needles
There are a few common myths worth clearing up.
Myth 1: Bigger Gauge Means More Pain
Not always. A 21-gauge needle isn’t large and often causes less pain than smaller needles that require more time.
Myth 2: Butterfly Needles Are Only for Children
Butterfly needles are use for patients of all ages, including adults.
Advantages for Healthcare Professionals
Healthcare workers also benefit from using a 21 gauge butterfly needles.
Professional Benefits
Better control during insertion
Reduced vein rolling
Easier handling during blood collection
Reliable sample quality
These advantages help explain why the 21g butterfly needle is a standard tool.
Final Thoughts
The 21 gauge butterfly needles is a very important medical tool today. It strikes a good mix between safety, comfort, and speed. In fact, millions of blood draws happen every day because people trust it.
Patients and anyone learning about medical care can feel more confident and trust their care more when they understand what a 21g Butterfly Needle is and how to use it. This needle is a real healthcare essential because it is easy to use, works well, and has a simple design.
You’ll understand what those tiny plastic wings mean and why the 21 gauge butterfly needles is such a wise choice if you ever see them again.
Giving medicine the right way matters. The syringe you choose can affect safety, comfort, and how well the medicine works. Many people mix up oral syringe and enteral syringe because they look similar at first glance. But they are not the same and using the wrong one can cause real problems.
In this guide, you’ll learn the clear, simple difference between an oral syringe vs enteral syringe, how each one works, and when to use them. We’ll keep things easy to read, practical, and helpful.
Why the Right Syringe Matters
Medicine errors often happen because of small mix-ups. One common mix up is using the wrong syringe. Oral and enteral syringes are designed to prevent mistakes, especially in babies, children, and people who use feeding tubes.
Choosing the correct syringe helps :
Deliver the right dose
Avoid choking or aspiration
Prevent medicine from going into the wrong place
Improve comfort and safety
What Is an Oral Syringe?
An oral syringe is a small medical tool used to give liquid medicine by mouth. It does not have a needle. Instead, it has a smooth tip that fits safely inside the mouth.
Common Uses of an Oral Syringe
Oral syringes are commonly used for :
Babies and young children
People who cannot swallow pills
Accurate dosing of liquid medicine
Key Features of an Oral Syringe
Design For oral use only
Easy-to-read markings that are clear
Safe mouth use with a smooth tip
Available in sizes of 1 mL, 5 mL, and 10 mL
Reasons Why Oral Syringes Are Better Than Spoons
Spoons aren’t always right. To avoid spills and the possibility of choking, use an oral syringe to measure the exact dose and administer it slowly.
Choosing a reliable manufacturer is crucial for safe and accurate oral medication delivery. KDLNC manufactures and supplies oral syringesfor easy use and accurate dosing. KDLNC oral syringes are used for administering liquid medicine to babies, children, and adults. Measurement markings and smooth tip designs enable caregivers to confidently administer the correct dose in home and clinical settings.
What Is an Enteral Syringe?
An enteral syringe is used to give medicine or nutrition through a feeding tube. It connects to tubes that go into the stomach or intestines, not the mouth.
Common Uses of an Enteral Syringe
Enteral syringes are used for :
Patients with feeding tubes (NG tube, G-tube, PEG tube)
Giving liquid nutrition
Delivering medicine directly into the stomach or gut
The enteral syringes have secure tube-compatible tips and clear labeling to minimize wrong-route medication errors. Syringes are suitable for hospitals, long-term care institutions, and home healthcare settings that prioritize patient safety.
The Main Difference Between Oral Syringe and Enteral Syringe
The biggest difference between oral syringe and enteral syringe is how and where they are used.
Feature
Oral Syringe
Enteral Syringe
Use
By mouth
Through feeding tube
Tip design
Fits in mouth
Connects to feeding tube
Safety role
Accurate oral dosing
Prevents wrong-route errors
Common color
Clear
Purple or labeled
Patient type
Babies, kids, adults
Tube-fed patients
Even though they both deliver liquids, they are not interchangeable.
Why the Difference Between Oral Syringe and Enteral Syringe Matters
Using the wrong syringe can cause serious harm.
Risk of Medication Errors
If liquid medicine meant for oral use is given through a feeding tube incorrectly, or if tube feeding liquid is given by mouth by mistake, it can lead to:
Choking
Aspiration into the lungs
Wrong dosage
Infection
That is why understanding the difference between oral syringe and enteral syringe is so important.
Safety Standards Exist for a Reason
Enteral syringes are designed so they cannot connect to IV lines. This reduces the risk of deadly errors, such as giving feeding formula into a vein.
Tip Design: A Major Difference Explained
Oral Syringe Tip Design
Oral syringes have a narrow, smooth tip. This allows:
Easy placement in the side of the mouth
Slow and controlled medicine delivery
Comfort for babies and children
Enteral Syringe Tip Design
Enteral syringes have a special connector that:
Locks into feeding tubes
Does not fit oral or IV connections
Prevents cross-use
This design difference is one of the most important safety features.
Color Coding and Labels
A major clear difference between oral syringe and enteral syringe is the color of them.
Oral Syringes
Usually clear or lightly tinted
Focus on clear measurement markings
May not have special warning labels
Enteral Syringes
Often purple or marked boldly
Labeled “Enteral Use Only”
Easy to identify in busy care settings
Color coding helps caregivers quickly grab the right tool.
When Should You Use an Oral Syringe?
Use an oral syringe when:
Giving liquid medicine by mouth
Treating babies or small children
Accurate small doses are needed
A spoon is not precise enough
Oral syringes are great for everyday medication needs at home.
When Should You Use an Enteral Syringe?
Use an enteral syringe when:
A patient has a feeding tube
Giving medicine through a tube
Delivering liquid nutrition
Working in medical or long-term care settings
Never use an enteral syringe for oral dosing unless a healthcare provider tells you to.
Can You Use an Oral Syringe for Tube Feeding?
No. This is a common and dangerous mistake.
An oral syringe:
May not fit the feeding tube properly
Can disconnect and spill
Is not design for tube pressure
Increases the risk of errors
Always use the correct tool designed for the job.
Can You Use an Enteral Syringe for Oral Medication?
In most cases, no.
Enteral syringes:
May be uncomfortable in the mouth
Deliver medicine too quickly
Are designed to avoid oral use
If oral dosing is needed, use a proper oral syringe.
Sizes and Measurements
Both syringe types come in different sizes, but their use differs.
Oral Syringe Sizes
1 mL
3 mL
5 mL
10 mL
These are ideal for small, precise doses.
Enteral Syringe Sizes
20 mL
35 mL
60 mL
Larger sizes help with feeding and flushing tubes.
Cleaning and Reuse Differences
Oral Syringes
Often reusable for short periods
Must be washed and dried after each use
Should be replaced if markings fade
Enteral Syringes
May be single-use or limited reuse
Must follow medical guidelines
Can wear out faster due to pressure
Always follow healthcare instructions for cleaning.
Difference Between Oral Syringe and Enteral Syringe for Babies
Enteral syringes are used only if the baby has a feeding tube
Never guess. If unsure, ask a nurse or doctor.
Difference Between Oral Syringe and Enteral Syringe in Hospitals
In hospitals, the difference is even more important.
Hospitals use enteral syringes to:
Prevent tubing mix-ups
Follow safety rules
Protect patients from serious errors
Oral syringes are kept separate and use only for oral dosing.
Cost Differences
Oral Syringes
Low cost
Widely available in pharmacies
Often free with prescriptions
Enteral Syringes
Slightly more expensive
Specialized design
Often provided through medical suppliers
Cost should never be the reason to use the wrong syringe.
Common Myths About Oral and Enteral Syringes
Myth 1: They Are Basically the Same
They are not. The difference between oral syringe and enteral syringe is about safety, not just shape.
Myth 2: One Syringe Can Do Both Jobs
This is unsafe and not recommended.
Myth 3: Color Doesn’t Matter
Color coding helps prevent serious medical mistakes.
Safety Tips for Caregivers
Store oral and enteral syringes separately
Label syringes if needed
Never force a syringe into a connection
Replace worn or damaged syringes
Ask questions if unsure
These small steps can prevent big problems.
Final Thoughts
The difference between oral syringe and enteral syringe may seem small, but it plays a huge role in safety and proper care. Oral syringes are made for the mouth. Enteral syringes are made for feeding tubes. Each has a clear purpose.
By using the right syringe every time, you protect patients, avoid mistakes, and give medicine or nutrition the safe way. If you have any doubts, pause and consult a healthcare professional.
There’s a good chance a butterfly needle was used the last time you had blood drawn or were given IV medication. 23 gauge butterfly needles are one of the most popular sizes. It may not seem important, but it is very important for the patient’s safety and correct blood collection. The purpose of this guide is to explain what a 23 gauge butterfly needle is, how it works, when it is used, and why healthcare professionals choose it.
What Is a Butterfly Needle?
A butterfly needle is a small needle with two flexible plastic “wings” on each side. These wings help healthcare workers hold the needle steady during blood draws or IV access.
They are designed for short-term use and are often used when veins are small, fragile, or hard to find.
What Does “23 Gauge” Mean?
The word gauge refers to the thickness of the needle.
Understanding Needle Gauge Size
When the gauge number goes up, the needle gets smaller.
When the gauge number goes down, the needle gets larger.
That means a 23 gauge butterfly needles is a bit smaller than a 21 gauge needle but not quite as thick as a 25 gauge needle.
Why Gauge Size Matters
What the gauge does is:
Level of comfort
Blood flow speed
Vein safety
accurate lab results
People often choose a butterfly needle 23 gauge size because it is a good compromise between being able to place the needle gently and reliable blood flow.
What Is a 23 Gauge Butterfly Needle?
A 23 gauge butterfly needles is a thin, winged needle attached to flexible tubing. It is commonly used for blood draws and short IV treatments, especially in patients with delicate veins.
Important Things About a 23 Gauge Butterfly Needles
Thin needle (23 gauge)
Short needle length
soft plastic wings for control
Flexible Tubing
A safety shield included
Hospitals, clinics, labs, and outpatient centers all allow this type of needle.
Parts of 23 gauge Butterfly Needle
Getting to know the parts can help you figure out why it works so well.
Needle
The thin stainless steel
Sharp Beveled Tip
Designed for Smooth Insertion
Wings
Soft, flexible plastic
Handle and grip better.
Can be taped down to keep it stable
Tubing
Easy to use and flexible
It’s easy to connect to IV lines or collection tubes.
Safety Mechanism
To prevent needlestick injuries, the majority of modern 23 gauge butterfly needles have a safety shield that locks over the needle after use.
Common Uses of a 23 Gauge Butterfly Needle
Healthcare providers choose a 23 gauge butterfly needles for various reasons. It works well when comfort and precision matter.
Blood Draws (Venipuncture)
Drawing blood for lab tests is a common use. The thin needle minimizes discomfort and maintains proper blood flow.
Pediatric Patients
Children often have smaller veins. A 23 gauge butterfly needles helps reduce pain and lowers the chance of vein damage.
Older Patients
As people age, veins can become fragile. This needle size helps prevent vein collapse and bruising.
Patients With Difficult Veins
Patients who are:
Dehydrated
Undergoing chemotherapy
Very thin
Chronically ill
often benefit from a 23 gauge butterfly needles.
Why Healthcare Professionals Choose a 23 Gauge Butterfly Needle
More Control During Insertion
The wings help the doctor keep the needle stable and put it in at a shallow angle. This makes things more accurate and comfortable.
Less anxiety for patients
The smaller size appears less scary than the bigger needles. This may help patients feel less anxious during operations.
How Long Can a 23 Gauge Butterfly Needle Stay in Place?
A butterfly needle is meant for short-term use only.
Typical Time Limits
Blood draw: removed immediately after collection
IV access: usually no more than a few hours
It is not designed for long-term IV therapy.
Safety and Infection Control
Single use only
A 23 gauge butterfly needles is always single use. It is dangerous and against the law in hospital situations to reuse needles.
Sterile Packaging
To prevent contamination, each needle is sealed.
Safe Disposal
To protect healthcare workers and patients, the needle is put into a sharps container after use.
Advantages and Disadvantage Using a 23 Gauge Butterfly Needle
Advantages
Gentle on veins
Easier to control
Ideal for small or fragile veins
Reduces patient stress
Widely available
Disadvantage
It is useful, but not ideal for all scenarios.
Reduced Blood Flow
A thinner size may reduce blood collection speed compared to larger gauges.
Not Suitable for Every Test
Tests needing large blood volumes may require a thicker needle.
Who Should Avoid Using a 23 Gauge Butterfly Needle?
For patients with large, strong veins requiring quick blood collection, a lower gauge needle can be more effective. Healthcare providers select needle size according to the situation.
Why Patients Often Prefer Butterfly Needles
Many patients say butterfly needles feel:
Less scary
More comfortable
Faster and smoother
This preference is one reason they are widely used in labs and clinics.
Final Thoughts: Is a 23 Gauge Butterfly Needle Right for You?
A 23 gauge butterfly needles is a small but powerful tool in modern healthcare. It offers comfort, precision, and safety for patients who need gentle vein access. From blood tests to short IV treatments, it plays a key role in everyday medical care.
If you are nervous about needles or have been told you have small veins, this type of needle may be exactly what your healthcare provider chooses—and for good reason.
Understanding what it is and how it works can make your next blood draw feel a little less stressful and a lot more manageable.
This website uses cookies.
We use cookies to offer you a better browsing experience, analyze site traffic, for social media and advertising, and to improve the website. To learn more, view our Privacy Statement.
Sign up for Our Newsletter or Request More Information Here
 +86-791-8686-1216